Dreaming of a basement golf simulator but worried about low ceilings, tight space, or an unfinished room? A basement golf simulator turns your lower level into a dedicated indoor hitting bay, combining an impact screen, enclosure, launch monitor, projector, and hitting mat so you can play golf at home. Whether you’re working with a standard 9-foot basement or digging down to get a full driver swing, there are smart ways to turn your downstairs space into an indoor golf haven.
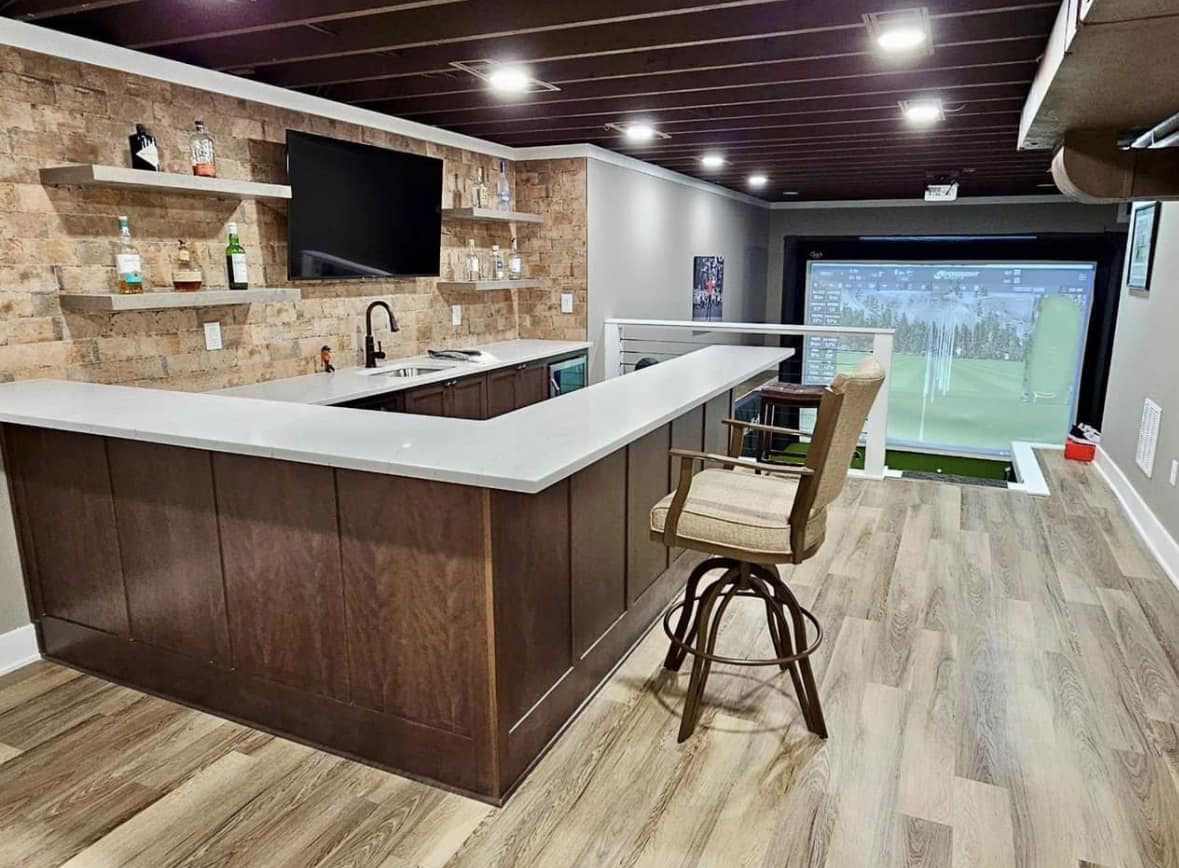
Photo courtesy of James L.
Basement Golf Simulator Specs at a Glance
Quick room dimensional guidelines to help you confirm fit before you start framing, digging, or ordering your golf simulator enclosure.
| Minimum | Recommended | |
|
Ceiling Height |
8-9 ft Limited swings, dependent on golfer height, swing type, and club used. |
10 ft+ |
|
Room Depth |
15 ft (total room depth) 1 ft behind screen + 10 ft screen-to-ball + 4 ft behind ball. Also launch monitor dependent. |
18-20 ft (total room depth) 1 ft behind screen + 10-12 ft screen-to-ball + 7 ft behind ball. Also launch monitor dependent. |
|
Room Width |
10 ft With an offset hitting area. |
14 ft+ To allow centered hitting for both right- and left-handed golfers. |
Need to double-check your space before you commit?
Measuring for a Golf Simulator →Basement Golf Simulator Space Requirements
The table above gives you a quick snapshot. Before you order an enclosure or launch monitor, it’s worth spending a few minutes to validate your exact measurements. Grab a few clubs and actually swing them (CAREFULLY) in the spot where your hitting area will be. Make sure you’ve got enough room above, behind, and to the sides.
Ceiling Height
- 8 ft: Generally only workable if you’re focusing on shorter clubs (irons and wedges) and you’re comfortable adjusting your swing.
- 9 ft: Often fine for wedges and mid-irons, and sometimes driver for shorter golfers or flatter swing planes.
- 10 ft and up: The sweet spot for a basement golf simulator where most players can swing driver confidently without worrying about the ceiling.
If your ceiling height is marginal, you can still create a useful setup by focusing on specific clubs, tweaking ball position, or, if you’re serious about full-swing driver work, excavating a portion of the floor to gain headroom.
Room Depth
- Ball-to-screen distance: Many camera-based systems work well with about 10-12 ft from the ball to the impact screen.
- Radar-based systems: Units that sit behind the golfer often need 14-16+ ft from the unit to the screen to properly track ball flight.
- Behind the ball: Plan on roughly 6-7 ft behind the golfer for a comfortable backswing and follow-through.
- Behind the screen: Allow at least 12 in. of space between the screen and the wall so the screen can absorb impact and protect the wall.
When you add these together, many basement golf simulators are most comfortable with around 18 ft of total room depth, especially if you want flexibility to change launch monitors later.
Room Width
- 10-12 ft: Can work well for a single right-handed (or single left-handed) golfer.
- 14 ft+: Ideal if you want both right- and left-handed golfers to use the same bay without feeling cramped.
If your golf simulator space is narrower than the ideal 14 ft, the center of the room might not be the best place to stand. If the wall behind your trail side feels like a physical or mental obstacle, shift into an offset layout: move the hitting area closer to one side of the room so your swing has more clearance, while still aiming the ball line at the center of the impact screen. Many home golfers with tighter basements use this offset approach very successfully.

What If Your Basement Ceiling Is Too Low?
Basements often lack sufficient height for a golf simulator. If your low-ceiling basement doesn’t have enough height for a full golf swing, you can explore other areas of your home to fit a golf simulator or consider excavating a portion of the basement floor. It might be the best way to get the basement golf simulator of your dreams.
Consider Where Else You Could Put a Home Golf Simulator
- Basement: Great for noise control and immersion; often better for darker, theater-like conditions. Ceiling height and moisture are the main challenges.
- Garage: Typically offers more open depth and width, but can be harder to heat, cool, and keep dust-free. Door tracks and cars can complicate layouts.
- Spare room or bonus room: Easiest to finish nicely and closest to everyday living, but may not have the depth or width required, and noise can be more of a concern if the space is multipurpose.
- Shed: An on-site but separate space you can size exactly for your indoor golf simulator. Building an entirely new structure is more costly and you’ll need to plan for power, climate control, and internet. See Carl's Golf Sim Shed plans for inspiration.
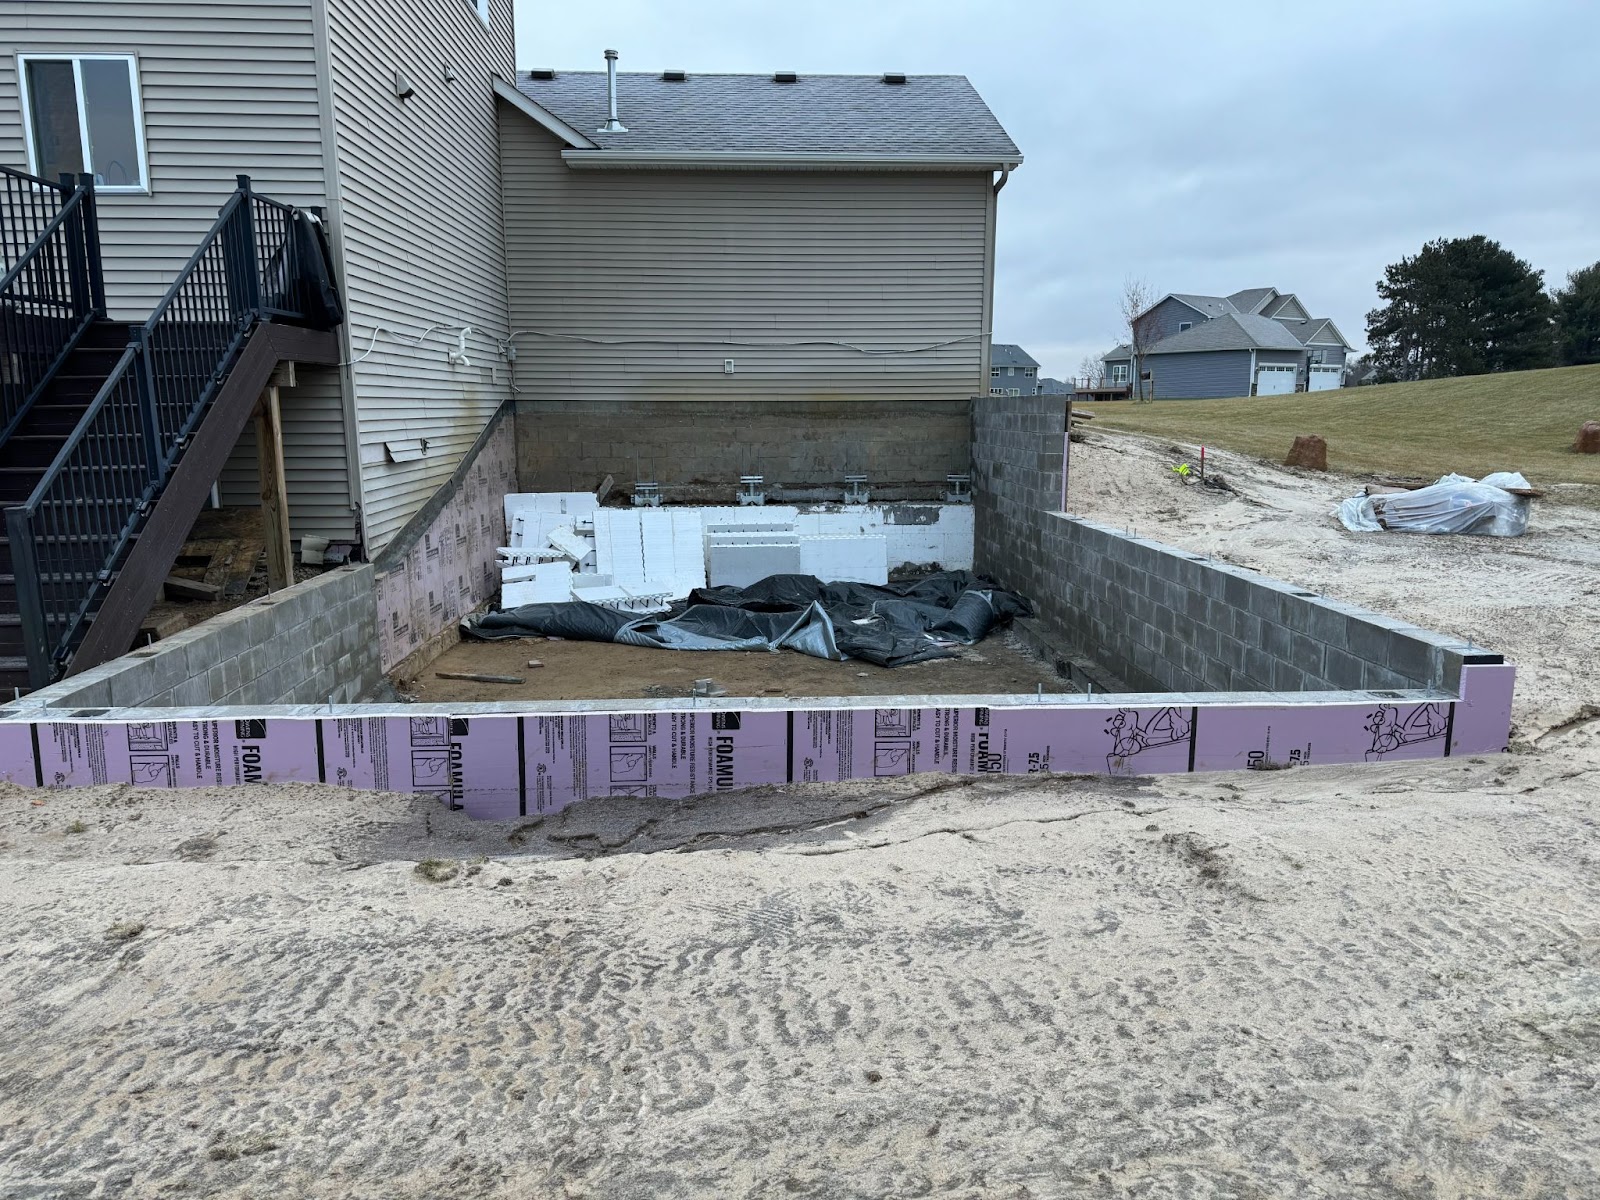
Preparing to Dig Out Your Basement for a Golf Simulator
Excavating is a big project and should be taken seriously. In many cases, you’ll want to work closely with local contractors, structural engineers, and your municipality.
If you decide excavation is the solution, it’s important to properly prepare your basement. Start by clearing out any items or furniture that may be in the way. You want a blank canvas and safe access to the area you’ll be digging.
Next, assess the structural integrity of your basement. You’ll want to ensure that your foundation can support the rest of your house while you excavate the portion of the basement you’ve designated for a golf simulator. If there are any cracks or signs of damage, address them before proceeding.
Additionally, consider having a professional inspect the electrical and plumbing systems in your basement. Excavation can disrupt existing lines, so it’s crucial to understand what runs beneath your slab before you start digging.
Finally, check on permits or regulations required for excavating your basement. Depending on your location, there may be specific guidelines, inspections, or restrictions you must follow. Do the research and obtain any necessary permits to avoid legal and safety issues.
Understanding the Excavation Process
Digging out your basement for a golf simulator involves several key steps. We highly suggest you hire an expert, as excavating your basement can be a dangerous job with unforeseen repercussions. Here’s a simplified breakdown:
- Marking and measuring: Carefully mark the footprint of the future golf simulator area, including swing zone and enclosure.
- Digging: Using excavation equipment such as a backhoe or mini excavator, your contractor will dig out the designated area to the planned depth.
- Removing debris: Excavation generates a lot of dirt and debris. It needs to be removed from your basement to keep a safe, workable space.
- Leveling and compacting: Once the area is excavated, the soil or base material is leveled and compacted to create a stable base for the new slab or floor system.
- Installing support structures: Depending on your design, you may need new beams, columns, or wall reinforcements to properly support your home above.
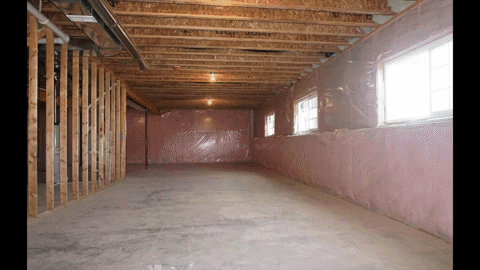
Once the floor is re-poured and cured, you can treat the excavated pit like any other part of the basement: frame walls, run electrical, and lay out your golf simulator space.
Choosing Your Basement Golf Simulator Components
Once you’ve confirmed the space available, it’s time to choose the main components of your basement golf simulator.
Enclosure and Impact Screen
A dedicated golf enclosure gives you a clean hitting bay, protects your basement walls, and makes the space feel like a real indoor bay. Freestanding golf enclosures provide a finished, custom-looking bay in a dedicated basement room. Or consider Carl's Built-In Golf Room Kit if you want a permanent, wall-to-wall, floor-to-ceiling look. Not sure? Compare which golf simulator type is right for you.
And of course, pair your enclosure with a high-quality impact screen. When it comes to golf impact screens, nothing beats Carl’s Place for clarity, durability, and all-around performance. With expert craftsmanship and materials built to last, Carl’s Impact Screens are the go-to choice for golfers who want the very best for their simulator.
Golf Simulator Hitting Mat & Flooring
The hitting mat is where your swing meets the space, so comfort and durability matter.
- Start with a quality hitting mat (for example, a premium insert or strip in a larger stance mat) that protects your joints and holds a tee well.
- Surround it with turf laid over cushioned subfloor such as foam puzzle-piece flooring to create a more realistic fairway look and feel.
- Consider cutting out a recess in your turf so your hitting mat sits flush with the rest of the floor.
Golf Simulator Electronics: Launch Monitor, Projector, and Software
The electronics are the brain and eyes of your basement golf simulator. While your enclosure and screen create the space, your launch monitor, projector, and software are what make it feel real. There’s no single “best” launch monitor for a basement golf simulator. It’s about matching your goals, space, and budget.
- Launch monitor: This tracks your ball and club data (speed, spin, launch angle, carry, etc.). Ceiling-mounted units are great for basement setups if you have the height. They keep the floor clear and work well for both right- and left-handed golfers without constant repositioning.
- Projector: A short-throw projector is ideal for basements since it can create a large, bright image from a shorter distance. These are typically mounted on the ceiling, either above or just in front of the hitting zone, to properly fill your impact screen.
- Software: This is what creates the courses, driving ranges, games, and practice environments. Some golf simulator software can give you access to thousands of courses, including many local and famous layouts, so your basement starts to feel like a golf trip every time you turn it on.
- PC: Don’t forget a capable PC to run your chosen launch monitor and simulator software.
Is a Basement Golf Simulator Worth It?
For many golfers, a basement golf simulator is the most practical way to get year-round golf practice. You gain convenience, more reps, and a fun space for friends and family. The trade-offs are the space you dedicate to it, the upfront investment, and the planning required to make sure your lower level is safe, comfortable, and structurally sound.
Instead of piecing together everything on your own, choose one of Carl's Ready-to-Golf Golf Simulator Bundles and then dial in your enclosure size and hitting area to match your space.
Designing the Space Around Your Basement Simulator
Once the structure and major gear are decided, focus on the details that make your basement simulator fun, comfortable, and usable all year.
- Lighting: Adequate lighting is crucial for a realistic and enjoyable golfing experience. Consider installing overhead lights or track lighting, positioned so it doesn’t cast harsh shadows on the ball, to ensure that your golf simulator area is well lit. You may also want to add dimmable lighting options to create different atmospheres like “sim mode” and “hangout mode.”
- Flooring: Plan for a durable and comfortable flooring option for your golf simulator area. One of the most popular options is to install foam puzzle-piece flooring to put under your choice of turf. That will provide a cushioned surface and a feel of a real golf course. This also provides flexibility if you want to cut out a space for your hitting mat so that it is flush with the rest of your turf.
- Soundproofing: To reduce noise and create a more immersive experience, use sound-damping treatments such as acoustic panels, added insulation, or heavy curtains.
- Ventilation: Ensure that your basement has proper ventilation to prevent the buildup of stale air and maintain a comfortable temperature. Consider installing vents or fans to improve air circulation.
- Seating, storage, and fun: Depending on the size of your basement, consider adding seating and storage options. A comfortable chair or sofa will allow you to relax between swings, while shelves or cabinets can be used to store your golfing equipment and accessories. If space allows, consider an extra TV or monitor, a mini fridge, or a game table so your basement simulator can double as a full-on rec room.
Real Customer Success Story
Golfing in a Basement with 9-foot Ceilings
Kyle H. had dreamed of having a home golf simulator for years. His family was ready to move out of its starter home into something a little bigger. All it took was finding a house with 9-foot ceilings in the basement for them to not only buy the house, but also plan a dedicated golf simulator room.

Kyle, who grew up playing hockey from age 5 through college with some golf sprinkled in between, turned his attention to improving his golf game after he retired from hockey.
“We live in the Midwest, so having a simulator will be amazing over the winter months,” Kyle said. “Right now, I’m around an 8 handicap and hoping the simulator can help me get better.”
When the family moved in, their new basement was completely unfinished. Kyle, a sales and design manager, put his design skills to work and tapped into a few of his wife’s family members, who work for a construction company. They finished their basement in a little over a month and carved out a more open room area for the simulator.
Their basement golf simulator build included Carl’s Place Pro Golf Enclosure Kit, BenQ MX819ST projector, Country Club Elite hitting mat, Uneekor EYE XO launch monitor, and TGC 2019 golf simulator software.

Design provided by Kyle H.

“TGC has been a really fun software. To have so many courses is amazing,” Kyle said. “I was also able to find my home course as well as a few other local courses. It seems funny to get a simulator that gives you the ability to play anywhere, but then you choose local courses… but it’s been super fun playing courses I know or grew up playing."
“I’m left handed, and the ability to seamlessly go back and forth from lefty to righty, and be able to use any ball I want, has been amazing (with the EYE XO),” he added. “I’m extremely impressed with the sensor's accuracy and reliability.”
|
|
Since the project was finished, Kyle said family and friends have been over almost every night to use it. Their goal for their home simulator is to entertain both family and friends, but also to work on their game.
“My wife loves golf and plays with me a lot, but really wants to focus on using this simulator to work on her game,” Kyle said. “My dad and father-in-law are also very into golf and love coming over, and I have some college hockey buddies who live close by and they are at my house almost every night using it.”
“(Carl’s Place’s) website is super easy to navigate, they have custom impact screens and sizes, and the support was way better than other places,” Kyle said. “Customer service was awesome. I’m super detail oriented and this was a big purchase for us, so I had a TON of questions. I probably drove them crazy sometimes, but they answered everything perfectly and were extremely helpful.”
Final Considerations for a Basement Golf Simulator
Basements come with a few unique challenges (and advantages) that are worth planning for before your simulator is installed.
Ceiling Obstacles
Even if your ceiling height is “technically” tall enough, watch for:- Beam pockets
- HVAC ductwork
- Electrical runs
- Bulkheads
- Floor joists
These can intrude into your swing path or projector line, so map them out early.
Moisture & Humidity
Basements naturally hold more moisture than other areas of the home. Use a dehumidifier to protect your turf, impact screen, electronics, and projector. Consistent airflow helps prevent mold and keeps materials performing long-term.
Dust & Air Quality
If your basement is unfinished or recently excavated, fine concrete dust can settle on equipment and inside electronics. Plan on sealing the space or installing your flooring before bringing in your simulator components. A simple box fan with a filter can also help during setup.
Ground-Level Comfort
Concrete slabs get cold. Adding a subfloor, foam tiles, or turf padding helps with temperature and joint comfort - especially during long practice sessions.
Light Control Advantage
One of the best perks of a basement simulator is easy light control. Take advantage of the darker environment for a brighter, cleaner projected image.
Basement Golf Simulator Quick Checklist
- Confirm space requirements: measure ceiling height, depth, and width; account for clearance behind the screen and golfer; choose centered or offset hitting; and identify any swing or projector obstructions. Decide whether you can work with your current floor or if excavation is needed.
- Choose your enclosure + screen: naturally you'll Carl's Place products, but will it be built-in or freestanding enclosure?
- Plan the flooring: hitting mat position, turf area, and any padding or subfloor for comfort.
- Select your electronics: launch monitor, short-throw projector, and software that fit your room type, goals, and budget.
- Prepare the basement: Add a dehumidifier, improve airflow and ventilation, plan power outlets and cable paths, and manage lighting and sound to make the space comfortable and equipment-friendly.
- Pull it all together: Instead of forcing your space to fit a pre-set size, Carl’s Place lets you build a simulator around your actual basement. Using the Build Your Own Golf Simulator tool, you can customize your enclosure size down-to-the-inch, choose your screen, hitting mat, launch monitor, and accessories based on your real measurements. All online. All custom. With clear up-front pricing. So your setup fits your room, not the other way around.
Search articles by tag:
Golf Impact Screens DIY Golf Enclosures Golf Simulators PRO Golf EnclosuresRelated Posts
Golf Simulators
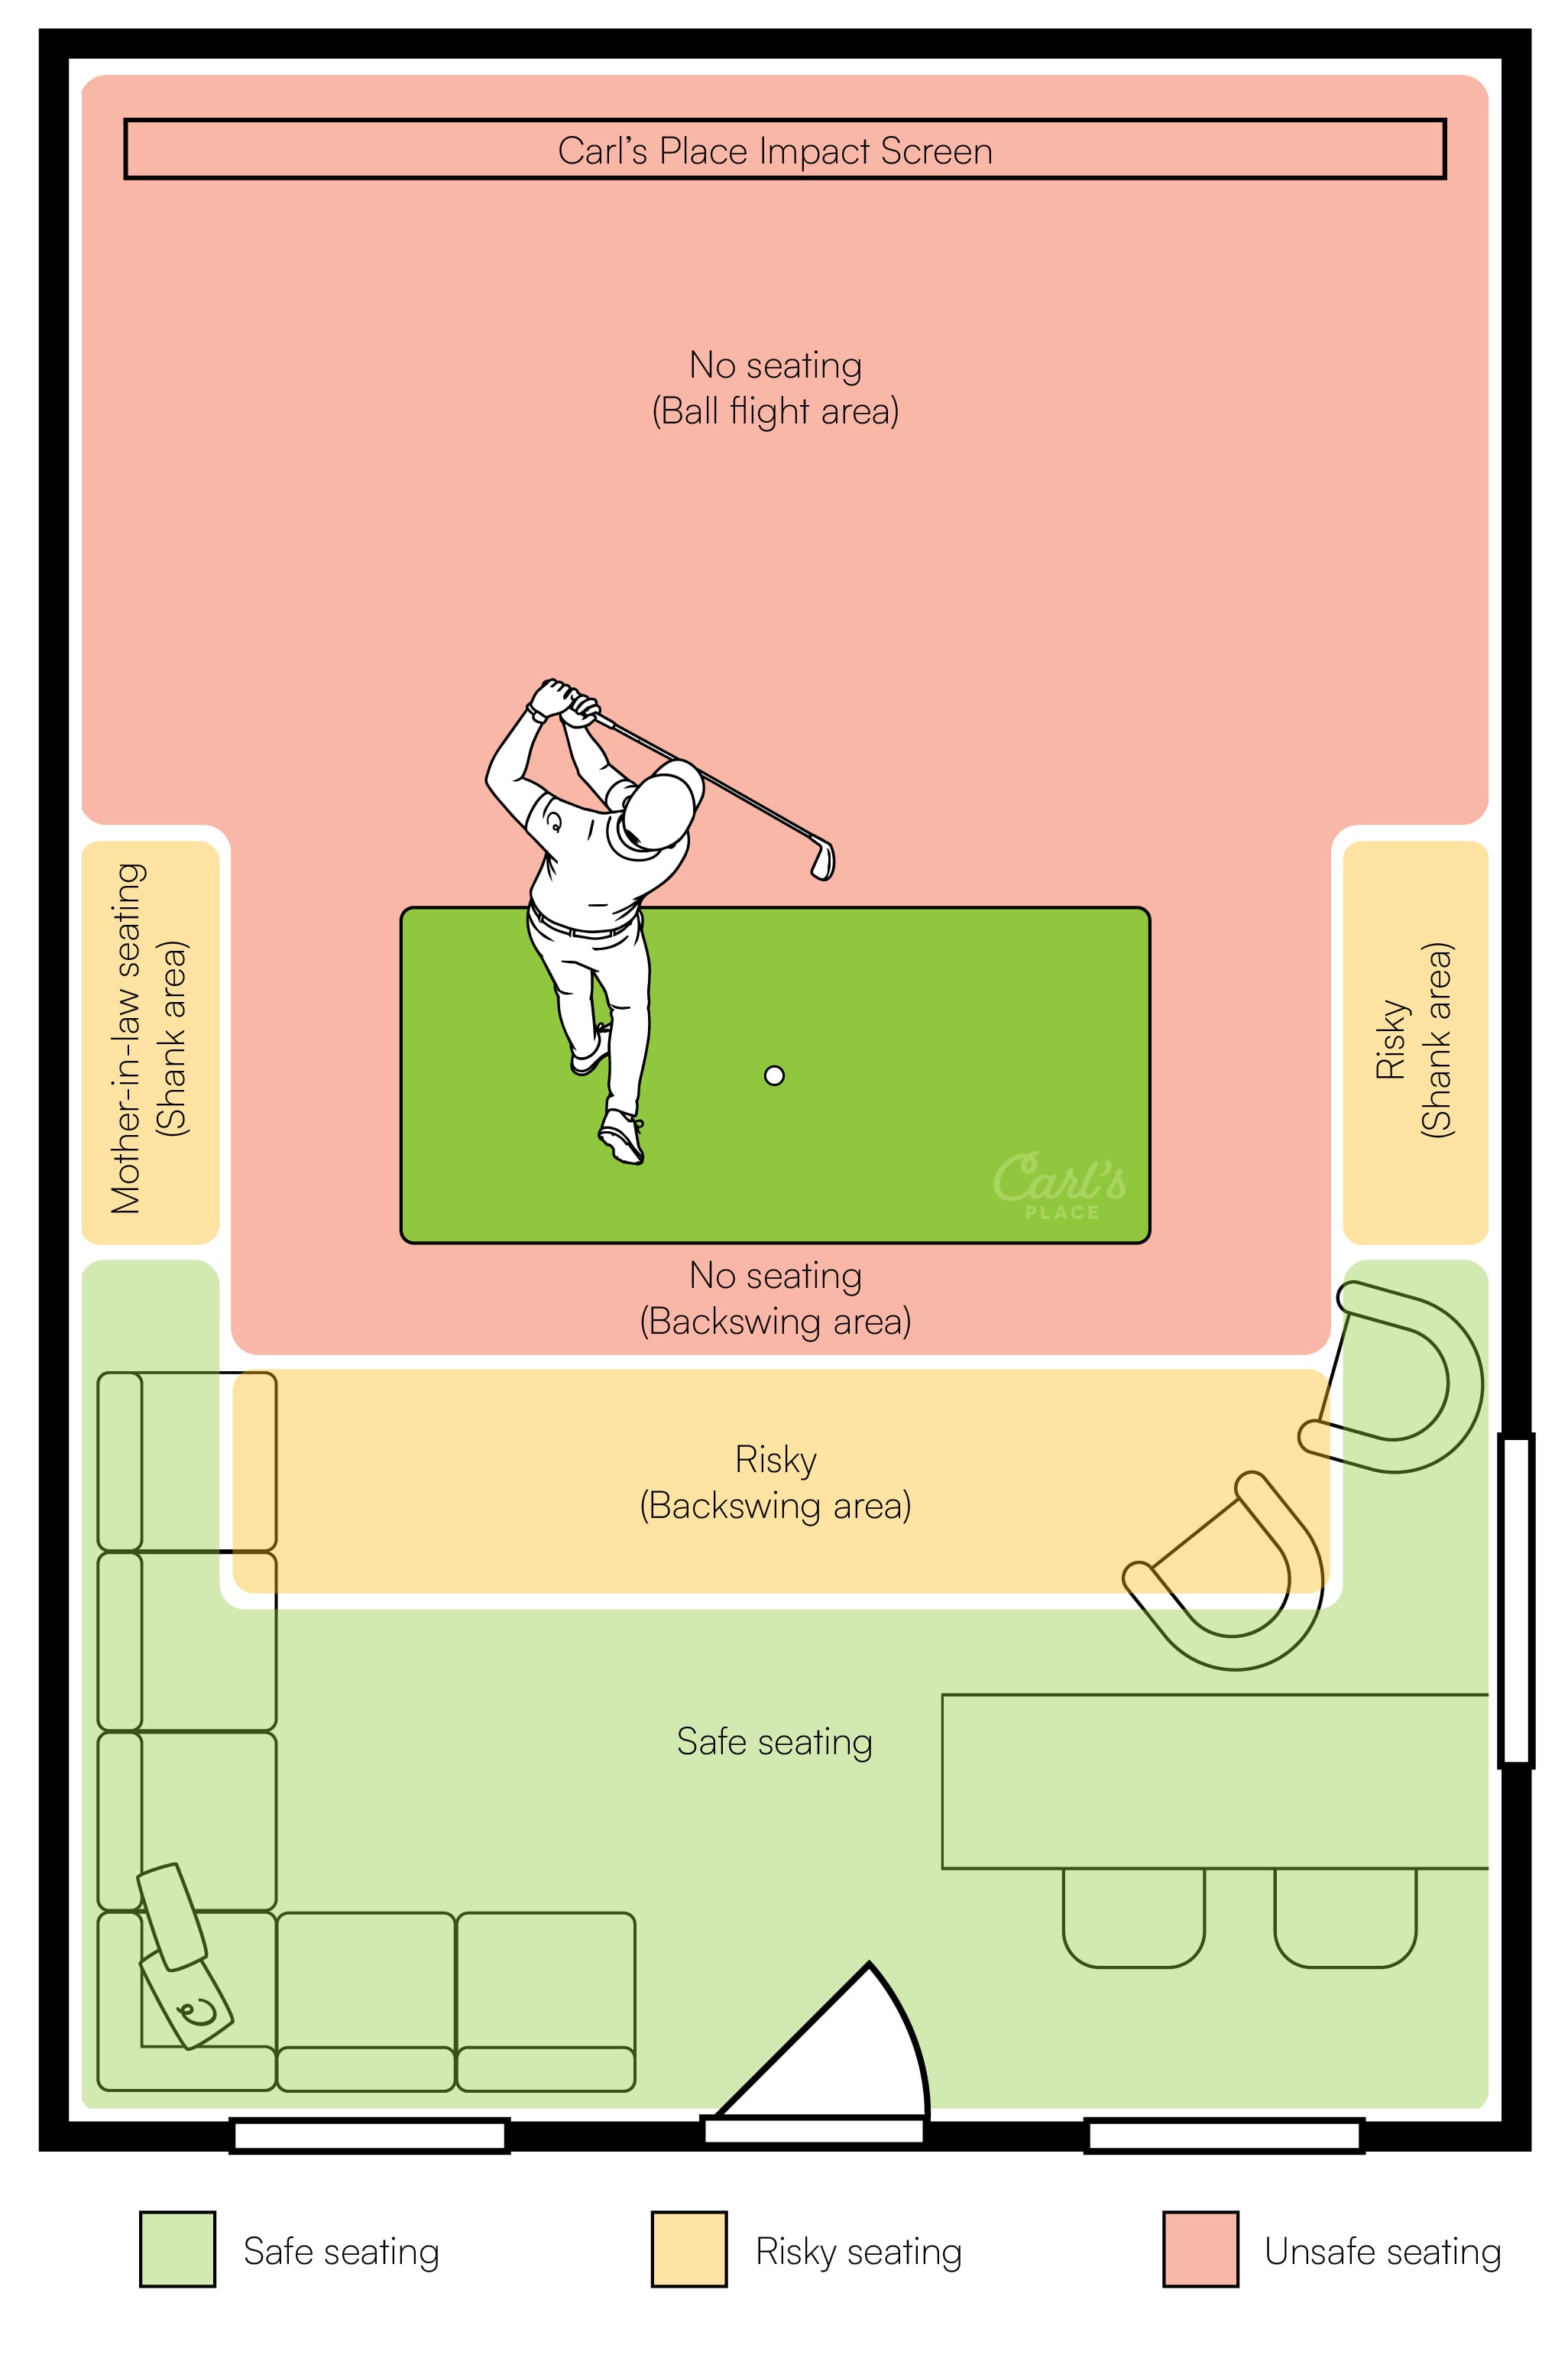
Golf Simulator Seating Ideas - Where Spectators Won't Get Hit
.jpg)
How-To, DIY Golf Enclosures, Golf Simulators
Garage Golf Simulator: An Easy DIY Setup

Golf Simulators
5 Benefits of a Golf Simulator