A DIY golf simulator lets you turn a garage, shop, or basement into a year-round practice space without paying for a fully installed, turnkey build.
In this guide on how to build a golf simulator, we’ll walk through how one Carl’s Place customer built his own DIY golf simulator and enclosure on a realistic budget, and how you can choose the right level of DIY for your own space, from simple net setups to full golf simulator enclosures.

Home Golf Simulator - How to Get Started
Many home golfers don’t jump straight to a full-blown golf simulator. They build up to it. Think of it in levels:
| Level 1: Indoor Practice Net Launch monitor + net + hitting mat. You’re hitting real balls indoors and getting data on a phone or tablet app. No screen or projector yet, but you’re already practicing year-round. |
Level 2: Hanging Screen You hang a golf impact screen in front of a wall or simple frame (for example, with finished-edge impact screen material). Pair it with a projector or TV and you’re now seeing shots play out on a big screen in front of you. |
Level 3: Golf Enclosure You upgrade to a full golf enclosure kit with impact screen for a clean, contained, dedicated simulator space that looks and feels like a real golf bay. |
Core Pieces of a True DIY Golf Simulator
Once you move beyond the “net and app” stage into a true golf simulator...which btw there is nothing wrong with a net and launch monitor home golf setup; it helps you get practicing more. It's a perfect way to get started golfing at home, but most home golfers end up upgrading to something that includes these same core components:
- Golf screen/enclosure - a golf impact screen sized to your space plus a way to hang or frame it
- Launch monitor - tracks ball and club data
- Projector - to show your virtual course or range on the screen in front of you
- Hitting mat and turf - for a safe, comfortable hitting area
- Compatible computer, tablet, or phone with simulator software - to run the virtual golf experience
How “built out” you go depends on your space, budget, and how immersive you want the indoor golf experience to feel.
Want a shortcut? Start by measuring your room and using our Build Your Own Golf Simulator tool to size an enclosure, impact screen, and key components for your space.

DIY Golf Simulator Options for Home Golfers
There isn’t just one “right” way to DIY a golf simulator. Most home golfers fall into one of these three setups.
Level 1: Launch Monitor + Net (Fastest DIY Golf Setup)

Story time! Our friend Guy (who provided all these photos of his home setup) started where a lot of DIYers do, Level 1, the launch montior + net. Guy's first home golf simulator included: the Garmin Approach R10 launch monitor, a pop-up hitting net, and a GoSports hitting mat.
All in, he spent about $740 for a net-based indoor/outdoor setup.
The Garmin ($600) is on par with a SkyTrak that costs $2,000,” Guy said. “It is super accurate, and it is great because it gives you all the metrics you need … I freakin’ love that launch monitor. I can’t talk enough about that thing.
He used it outside until it got cold, then moved the net setup into his shop with a canvas drop cloth behind it to catch wild shots.
Pros of the net + launch monitor approach:
- Lowest-cost way to get accurate data at home
- Portable and easy to move or store away
- Great for practice-focused golfers who don’t need a big projected image
Limitations: nets wear out over time, and without an impact screen and projector, you’ll be looking at a tablet or monitor off to the side instead of “playing” into a full-size virtual fairway.
Level 2: Hang a Finished Impact Screen (Simple DIY Enclosure Alternative)
If you’re ready to upgrade from a golf net, but not quite ready for a full enclosure, a finished impact screen hung directly on a wall or a simple frame is the go-to DIY middle ground.
Before you choose anything else, start with two decisions that determine how you’ll actually hang the screen:
- Your screen size
- Your screen edge style (this decides the mounting hardware)
With Carl's Build Your Own Finished Screen tool, you can choose it all in an easy step-by-step format.
- Exact sizing for your golf screen to fit your wall or DIY frame
- How to finish each edge of the golf screen such as:
- Grommets with reinforced vinyl edging to quickly attach bungees or zip-ties
- Vinyl edges without grommets to give you the durability of reinforced edges, but prefer to decide where (or if) hardware goes
- Vinyl edges with grommets and 1" loop fasteners which gives you the flexibility of grommets for securing the screen, plus a Velcro-ready surface for accessories
- Vinyl edges with grommets and flaps which gives you the same grommet benefits, plus a flap to cover the grommet area for a cleaner finished look
- Raw edge if you want total freedom to build whatever custom solution you want
Carl’s Place can finish impact screens in 125 different ways, so if you’re handy with framing or already have a finished wall, you can build your own support and let the finished screen do the clean-up work.
Plus you can choose one of Carl's screen materials (Standard, Preferred, Premium, or High-Contrast Gray). Not sure which one? Check our guide on choosing your golf screen material.
DIY Golf Screen Mounting Approaches People Commonly Use
Before you finalize your golf screen, it helps to have a solid plan on how you’ll hang it. Your mounting method and your edge finish work together, so deciding one usually informs the other.
Every home, garage, and basement is a little different, which is why DIYers use a wide range of creative mounting solutions. Across golf-sim forums, Reddit threads, and YouTube builds, people frequently use materials like:
- 2x4 or 2x6 wood framing
Often built as a simple rectangle or wall-mounted frame that allows you to tension a screen using bungees or hook-and-loop. Easy to cut, easy to replace. - Angle iron or slotted metal
A rigid, low-profile frame option people bolt to studs for a strong mounting surface. Popular when wall space is tight or you want a more “finished” look. - EMT conduit
Lightweight, affordable, and commonly used for custom frames or pipe runs when you want something stronger than wood but easier to work with than steel. - Ceiling-hung systems
Some DIYers suspend the top of the screen from ceiling joists and use minimal side framing for a floating setup.
These aren’t Carl’s-engineered methods. Just the types of builds you’ll see real DIYers sharing online. The structure behind the screen is entirely up to you.
Where Carl’s Place comes in is making sure you have a properly sized, high-quality impact screen with edge finishes that match your mounting plan.
Or...when you're ready to upgrade to an all-in-one golf enclosure kit.
Level 3: Golf Enclosure
Back to our friend Guy. Once the weather, the worn-out net, and the appeal of year-round golf pushed him “down the rabbit hole” into a full DIY golf simulator build, Guy decided he wanted a full simulator experience. A big screen in a contained space. A clean look. That's when he moved from a net to a full golf enclosure.
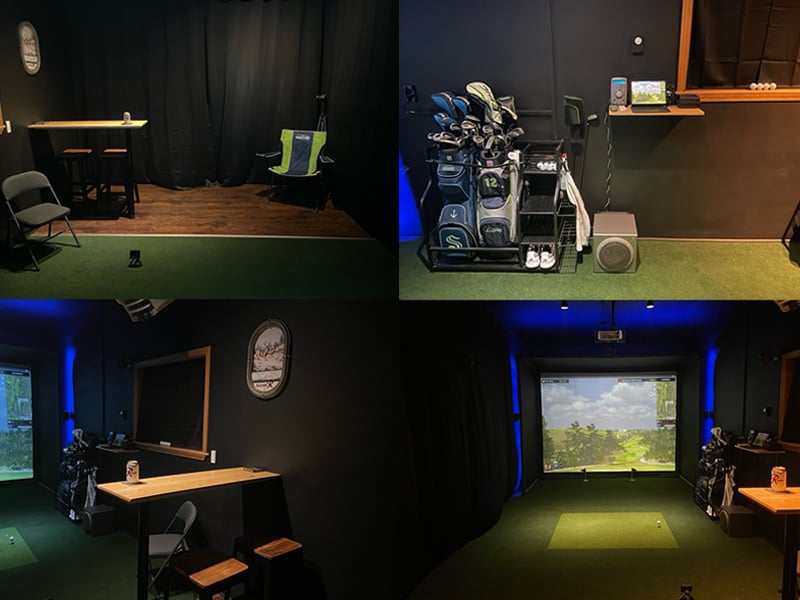
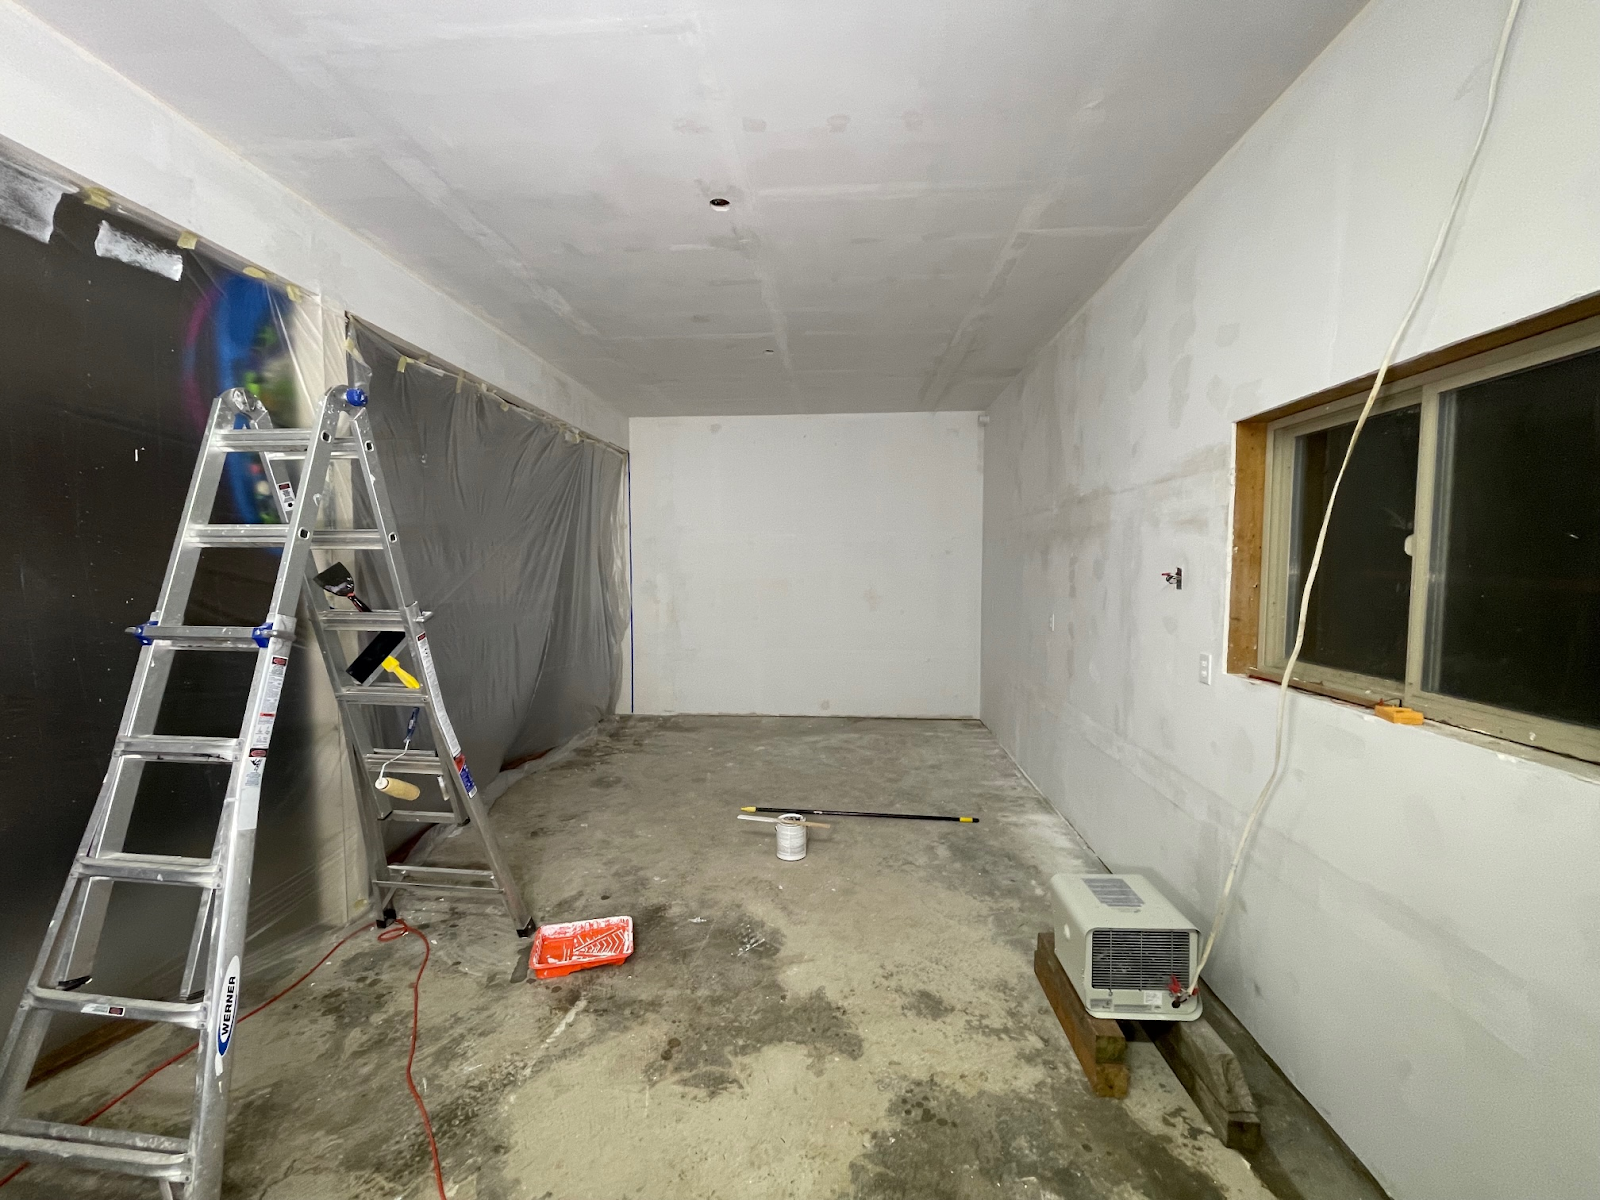 Planning and Prepping the Space
He also:
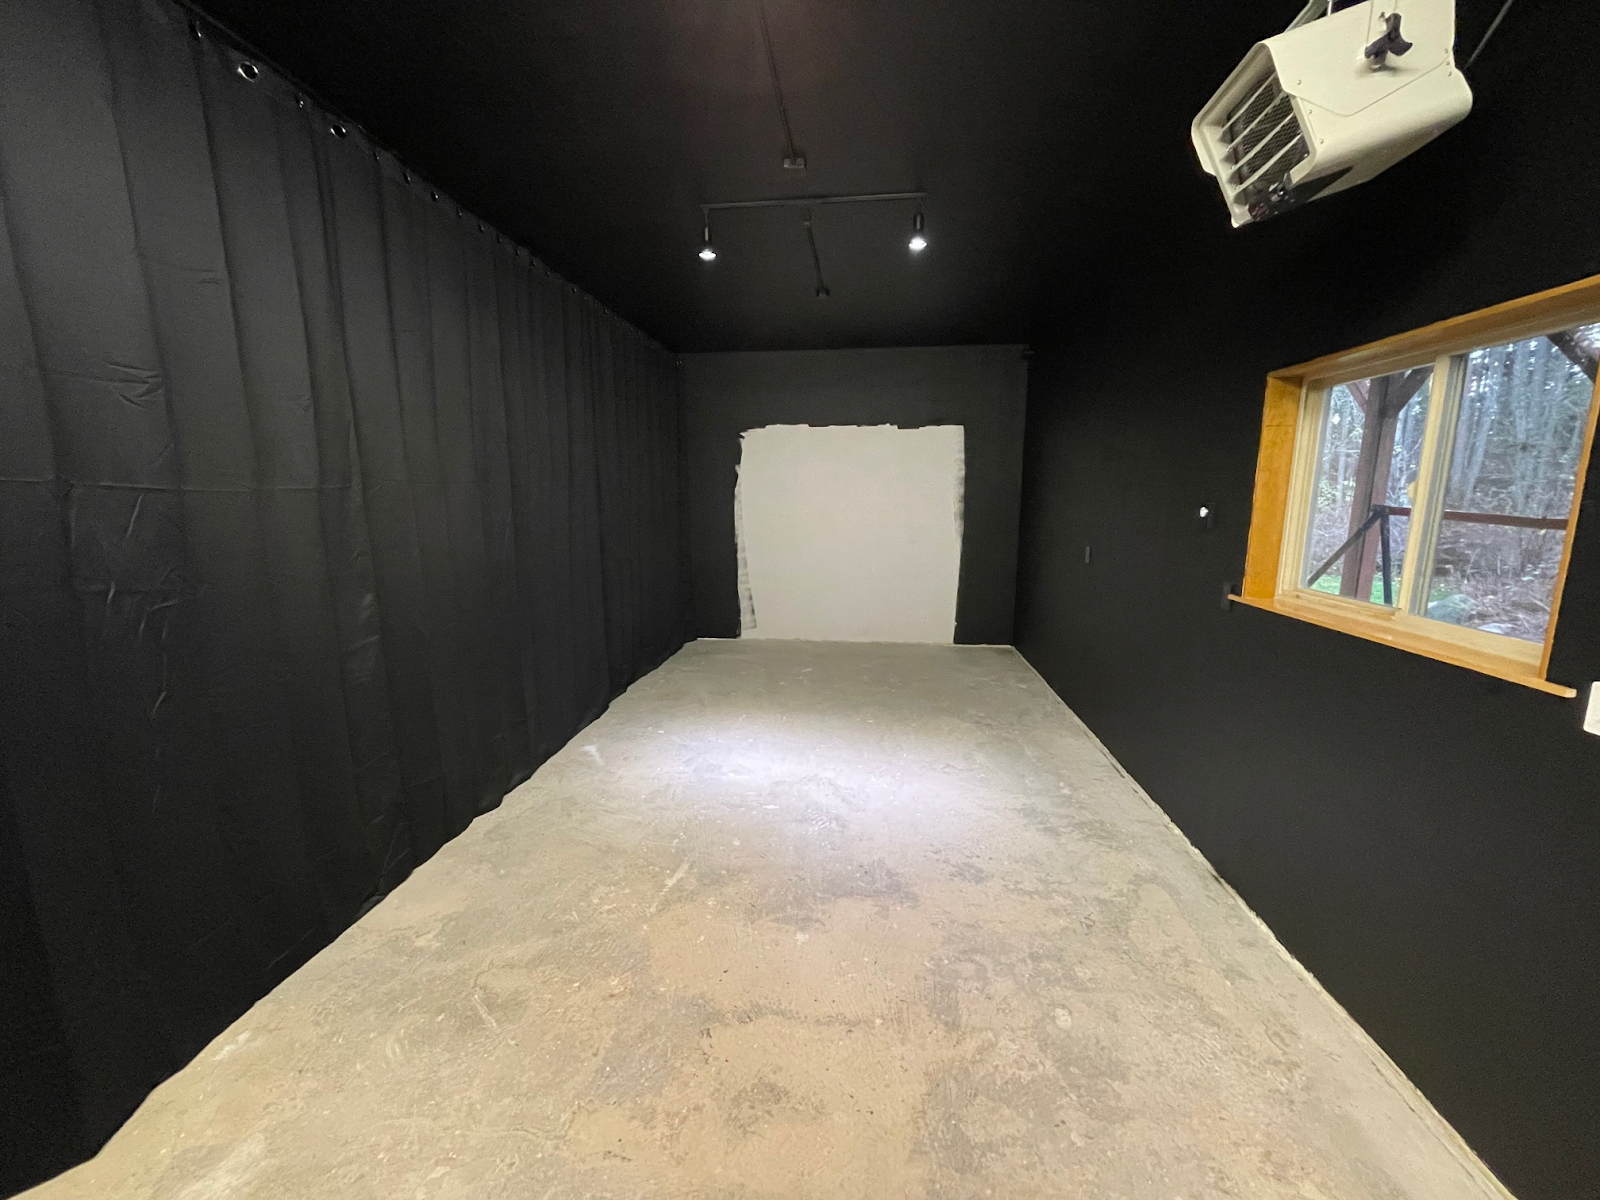
- Installed track lighting focused on the hitting mat without washing out the screen
- Hung several large room divider curtains to separate the sim from the rest of the shop and keep heat in
- Mounted a garage heater so winter practice would still be comfortable
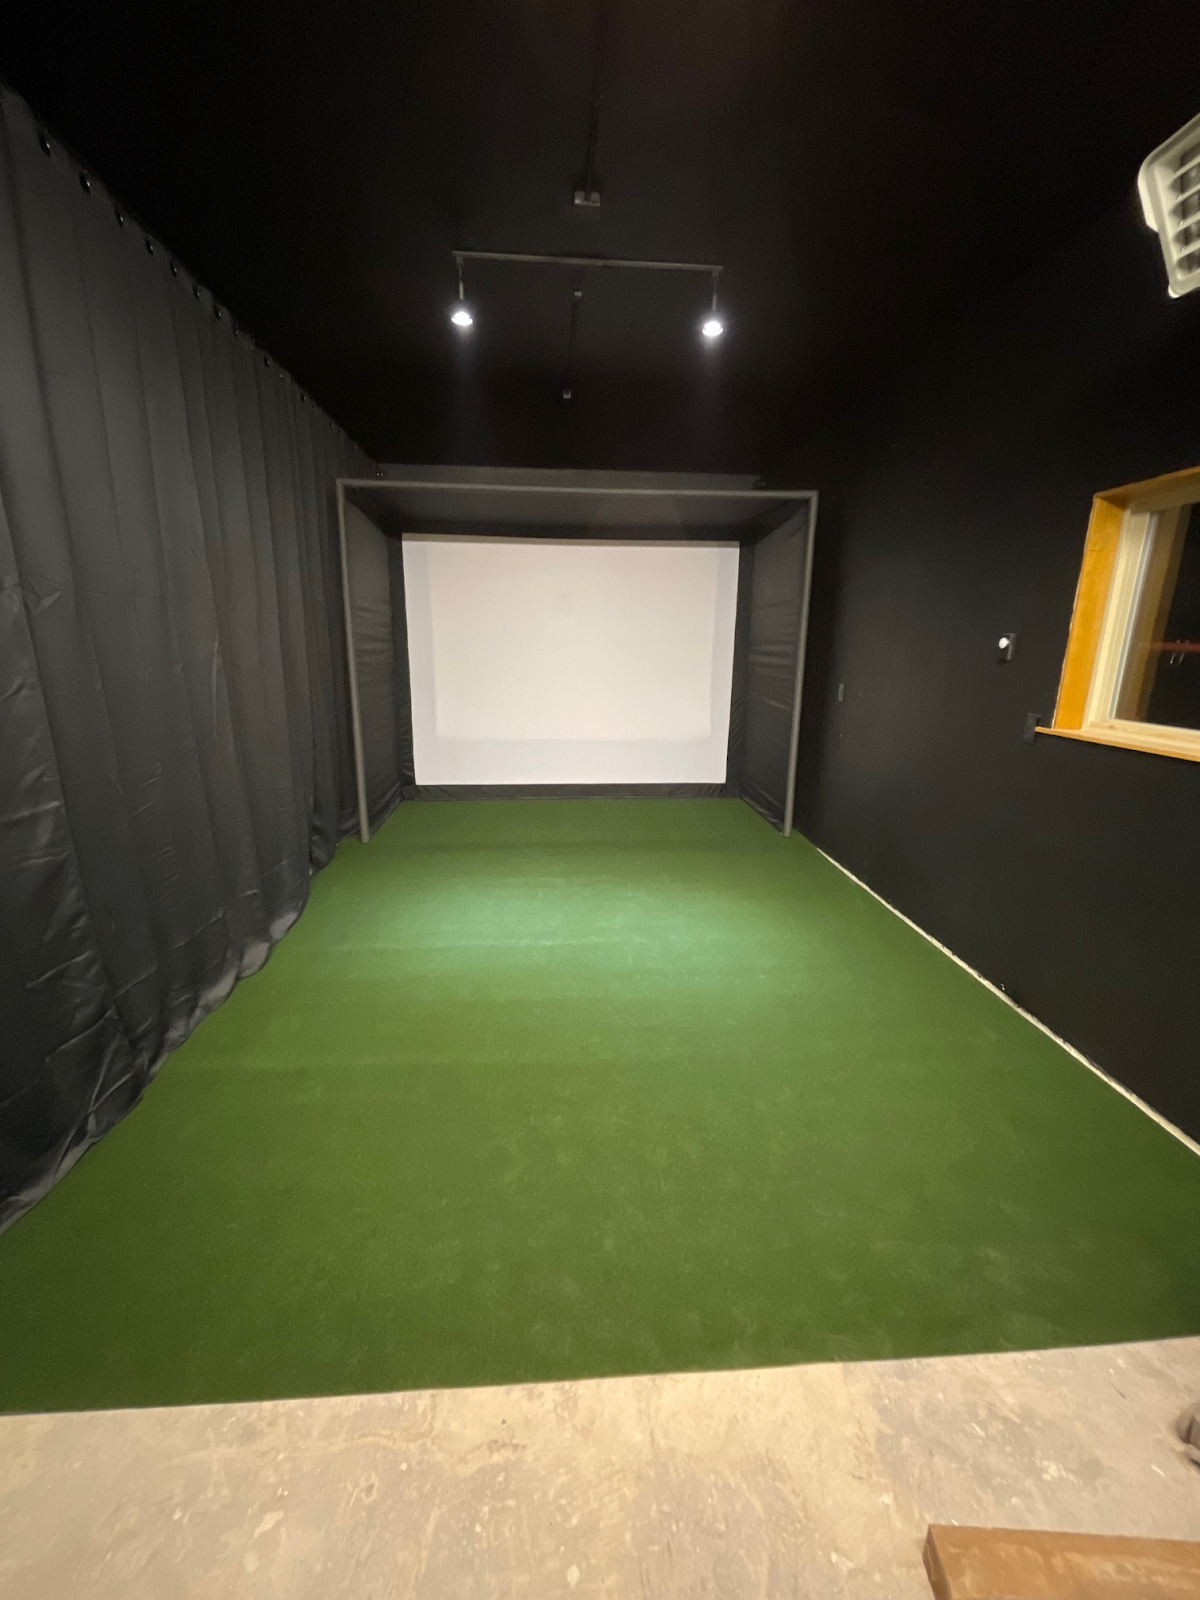
Assembling the DIY Enclosure Kit
For the core of his simulator, Guy chose a Carl’s Place 8x10.5x5 DIY Golf Simulator Enclosure Kit with Preferred Impact Screen.
That golf enclosure kit supplied:
- The wraparound fabric enclosure
- The golf impact screen, finished and ready to install
- The steel fittings to hold the pipes that build the frame (he sourced EMT conduit locally to save money)
- The fasteners that hold the screen to the frame
To protect the frame and soften ball strikes near the edges, he added 1-inch pipe foam to the front and depth pipes of the enclosure for frame and bounce-back protection for errant shots that don’t quite make it inside the enclosure.
Once the enclosure was assembled, he put 1-inch exercise mats underneath the Grizzly Grass turf that he bought from Lowes.
He only put the exercise mats to the front of the enclosure before stopping so that he could roll up the turf to install the projector without ruining the turf.
Electronics for Your DIY Golf Simulator
Projector, Launch Monitor, and Software
To complete the simulator, Guy:
- Kept using his Garmin Approach R10 as the launch monitor
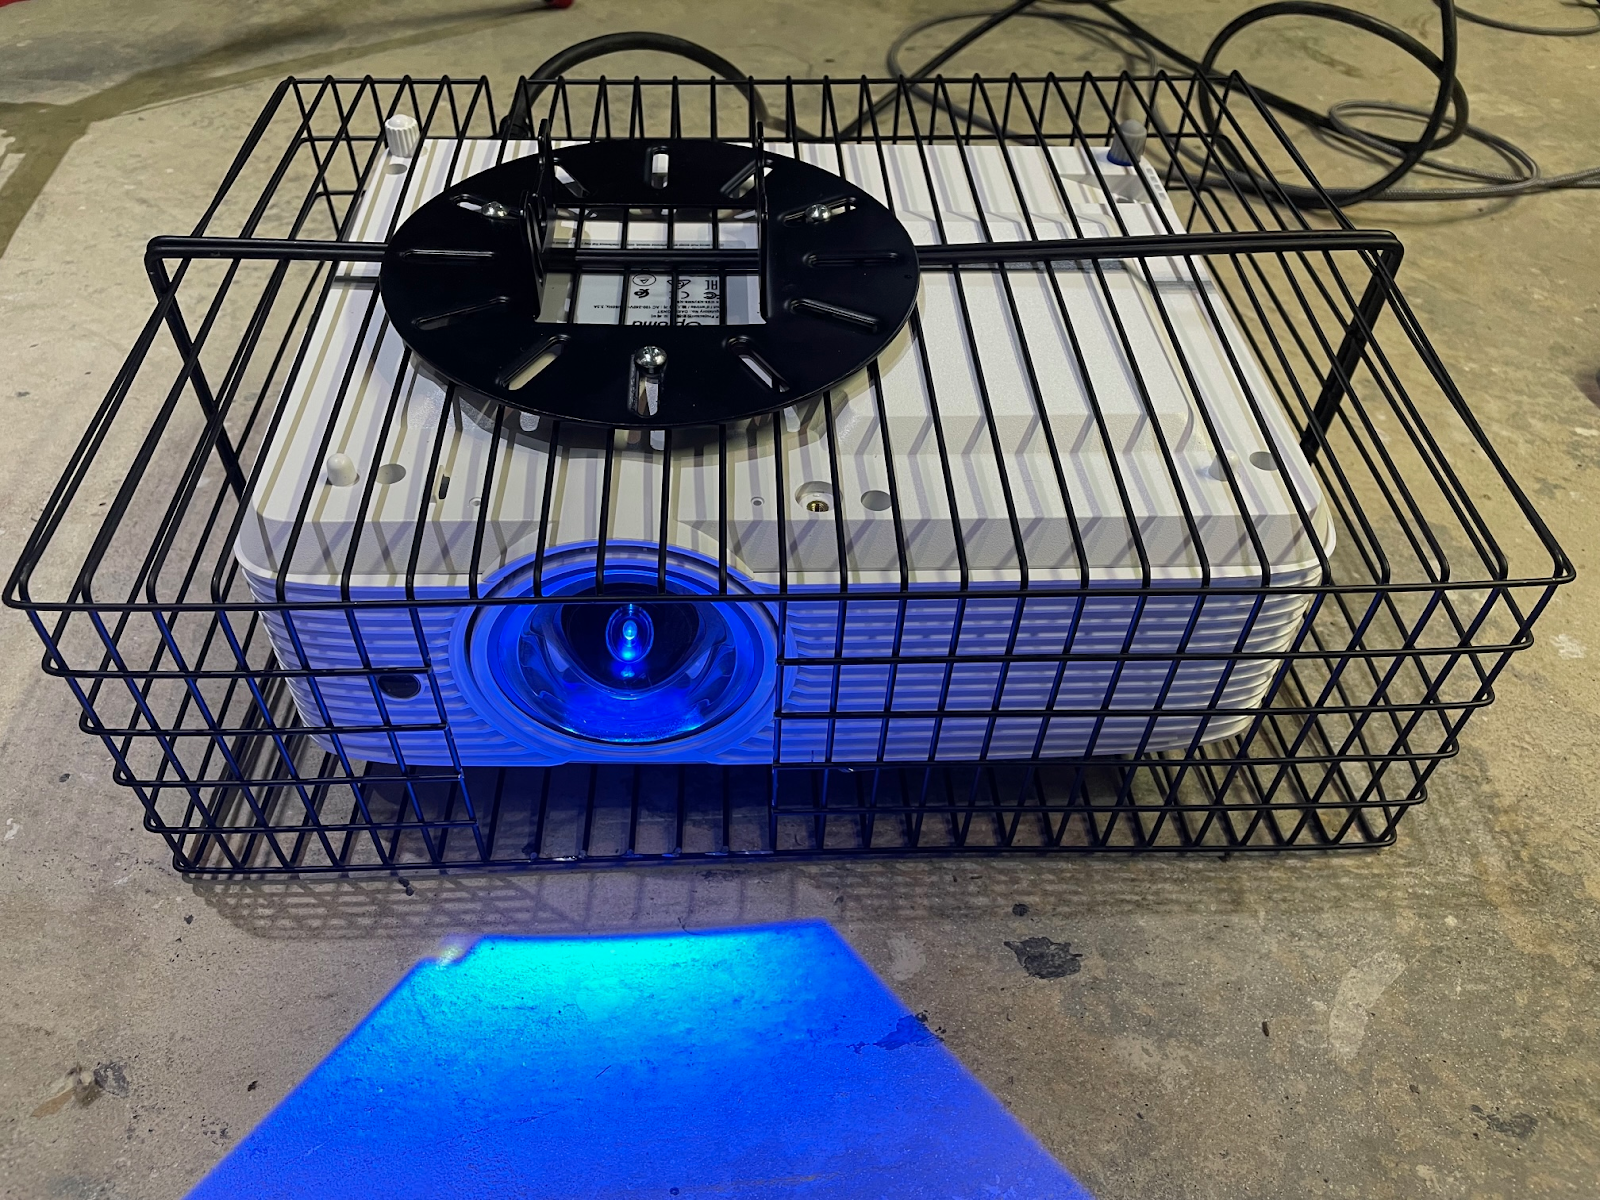
- Chose an Optoma GT1080HDR as a short-throw projector
“I wanted to go with a laser projector, but went with an Optoma GT1080HDR because of the budget,” Guy said. - Mounted the projector in a homemade cage using two metal organizer baskets and a Gibbon Universal Projector Mount
“I wasn’t too worried about a ball bouncing back and hitting the projector, but because it’s right over the top of your head, someone is going to have the club over their head and start waving it around and smack the projector,” Guy said. “I’d rather not destroy an $800 projector.” - Ran the Garmin app on an iPad

A few adjustments followed, mainly cutting out some of the foam exercise mat to insert his hitting mat...the kind of fine-tuning every DIYer ends up doing once the simulator comes to life.
The result? “I hit my longest simulated drive yet!” he said.
Upgrades for Your DIY Golf Simulator
Once the core simulator is in place (enclosure + impact screen + launch monitor + projector + hitting mat), everything else is about comfort and fun. Guy added several upgrades you might want to borrow ideas from:
Putting Cups in the Turf
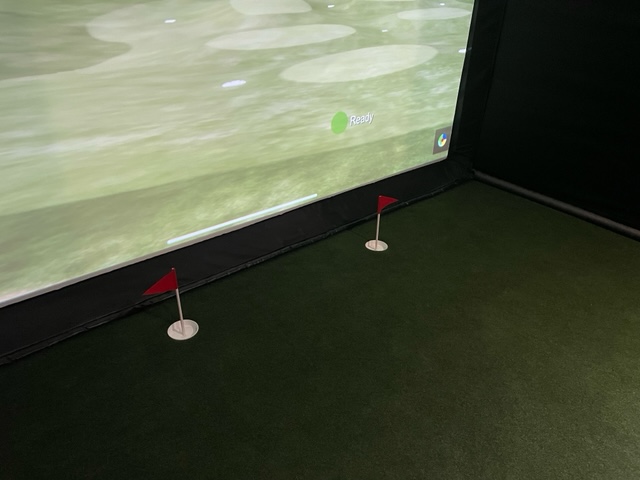
Although the Garmin R10 does not read putting, Guy still wanted a putting option. He used 4.25-inch drainpipe caps as cups, installing them into the turf and foam. His wife made flags from wooden dowels and red felt.
Club Storage, Sound, and Atmosphere
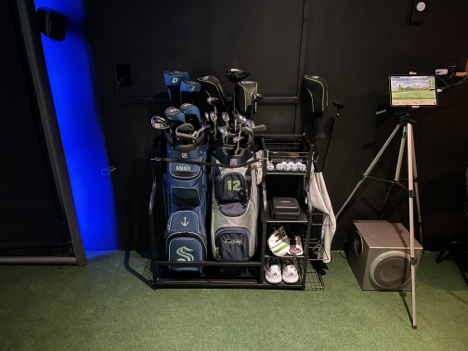
To keep things organized and immersive, he added:
- A golf bag holder so his bag wouldn’t tip over on the soft floor
- His 18-year-old Logitech 5.1 computer sound system with speakers around the enclosure
- LED strip lighting around the frame for a more “sim lounge” feel
Projector Lens Protection
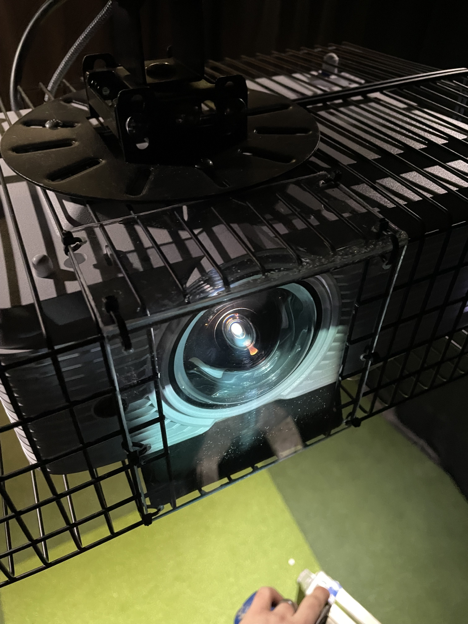
To keep dust and errant clubs away from the lens, he folded an 8x10-inch Lexan sheet into the cage opening. It protected the lens without distorting the image.
Bar and Hangout Area
Finally, he extended the sim area by about 5 feet and built a small bar with stools using:
- OSB subfloor and laminate flooring with a carpet transition
- Common board for the bar top, held up by adjustable table legs
- Bar stools
- A small wall shelf for his charging station and stereo using just two feet of this 1-inch-by-12-inch common board and 10-inch shelf brackets
Example DIY Golf Simulator Budget
So, for those of you who think a nice golf simulator room is stuck in your dreams or out of your budget, use Guy’s ideas as motivation.
This was a crazy project,” Guy said. “I set a goal of $3,000 with a budget of $4,500. I realized quickly that $3,000 wasn’t feasible. I was able to get the bare necessities for a decent sim for just over $3,200, so not too bad. But I had a lot of extra costs and it ended up, all-in-all, at nearly $5,500. Even at over $5,000 total cost, I would still call it a budget build considering the end result. My biggest pieces of advice for anyone starting a simulator project are plan, plan, plan and research, research, research. Dive deep into the golf simulator forums and subreddits to find all the info you need.
TL;DR - Here's the gear that one customer used to DIY a home golf simulator.
Golf Simulator Equipment for Guy's DIY Build
- 1" foam exercise mats: ~$1/sq ft
- Gibbon projector mount: $49.99
- 20' power cord: $10.66
- 25' HDMI 2.0 cable: $17.92
- 5x4 hitting mat: $149.99
- Carl’s Place 8x10.5x5 DIY enclosure + Preferred Screen: $799.95
- Garmin Approach R10: $599.99
- Optoma GT1080HDR projector: $799
- Metal organizer baskets (2): $15.83
- 8x10 Lexan sheet: $4.93
- 1" EMT conduit (10x10'): $169
- Grizzly Grass turf: $141.84
- 4" sewer drain caps (2): $5.26
- R20 track light kit: $40.47
- PAR20 LED bulbs (2): $9.24
- Gutter foam wedges (7): $41.16
- Pipe insulation (12): $104.16
Total before tax: $3,277.04
Extras for Guy's DIY Build
- Titleist Pro V1 balls: $49.99
- Curtain rod: $17.17
- Curtains: $18.99
- 32' LED strip: $18.99
- LED connectors: $6.99
- Blackout curtains (5): $175.80
- Curtain brackets: $12.99
- Window valances (2): $59.98
- 120–150" tension rods (2): $119.98
- Surge protector: $18.99
- HDMI splitter: $24.99
- Cable concealer kit: $17.54
- Garage heater: $180.09
- Heater thermostat: $23.36
- Telos tees (3): $9.64
- Rubber tees pack: $9.99
- Golf bag rack: $129.99
- iPad tripod mount: $29.99
- Tarp clips (2 packs): $12.36
- Canvas drop cloth: $21.40
- Track rail: $13.47
- Track conduit adapters (2): $8.07
- R20 heads (2): $23.34
- Track T adapters (2): $19.72
- PAR20 LEDs (2 packs): $18.48
- Bar leg/column: $89.03
- Bar stools (2): $123.52
- Drywall primer (2 gal): $23.37
- Flat black paint (3 gal): $53.97
- Black spray paint (2): $10.76
- 10" shelf brackets: $14.99
- 1x8x8 board: $15.76
- 1x12x6 board: $17.10
- PVC quarter round: $15.48
- OSB boards (4): $70.02
- Laminate flooring: $79.02
- Floor underlayment: $33.66
- Carpet transition: $13.48
Total before tax: $1,843.91
This post contains affiliate links. If you click through and make a purchase, Carl’s Place may receive a small commission at no additional cost to you.
WRAP UP: TURN DIY IDEAS INTO A REAL GOLF SIMULATOR
Guy’s build is one detailed example, but it’s just that: an example. Your DIY golf simulator doesn’t have to include a bar, surround sound, and a full room makeover to be worth it.
Many home golfers follow a similar path:
- Start simple with a launch monitor, mat, and net to make sure you’ll actually use it.
- Upgrade to a finished impact screen or DIY enclosure when you’re ready for a more immersive setup.
- Layer on extras like better turf, lighting, sound, and decor once the core pieces are dialed in.
As Guy’s project shows, the biggest wins usually come from planning, not from buying the most expensive gear. Measure carefully, read up on what other DIYers are doing, and decide how far you want to go now versus what can wait for “Phase 2.”
If you want to follow a similar path without reinventing the wheel:
- Use Carl's Build Your Own Golf Simulator tool to size an enclosure and/or screen for your room.
- Choose a launch monitor that fits your budget, space, and goals.
- Plan projector placement early so you’re not fighting shadows or redoing mounts later.
Whether you stop at a simple hitting bay or go all-in like Guy, a well-planned DIY golf simulator lets you practice more, play more, and actually enjoy indoor golf instead of just scrolling through simulator forums thinking about it.
Search articles by tag:
DIY Golf Enclosures TestimonialsRelated Posts

How-To, Golf Simulators, Projectors, Hitting Mats
See Golf Sim Data on the Floor with Projection Mapping
Golf Simulators, GSPro, TGC, TruGolf, Creative Golf 3D
Golf Simulators for Kids' Entertainment?
Golf Simulators, Testimonials,
A Golfer's Story: How to Practice Golf at Home